

How To Install A Brush Guard
How to Install Barricade Brush Baby-sit - Gloss Black on your F-150
Installation Time
3 hours

Shop Parts in this Guide
- Barricade Brush Baby-sit; Gloss Black (09-14 F-150, Excluding Raptor)
- Battlement Brush Guard; Stainless Steel (09-14 F-150, Excluding Raptor)
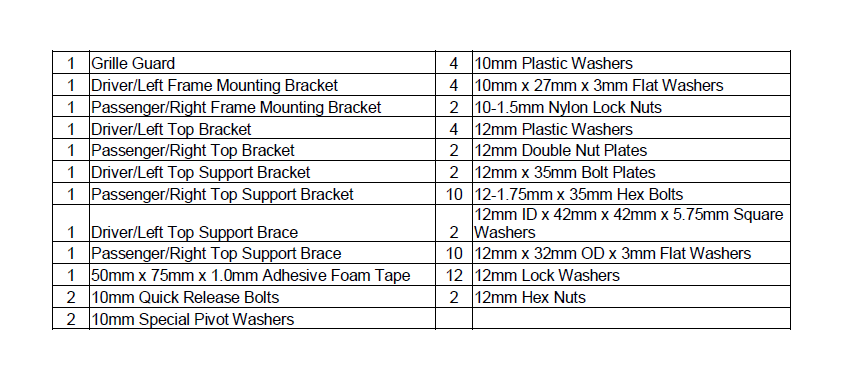
PARTS List:
Process:
Carefully BEFORE STARTING INSTALLATION. ASSISTANCE IS RECOMMENDED. CUTTING IS REQUIRED ON VEHICLES WITHOUT TOW HOOKS. LICENSE PLATE MUST BE RELOCATED ON VEHICLES EQUIPPED WITH ECOBOOST.
Alert! This Grille Guard is designed to tilt forward to open the hood for service. The Summit Bracket
Quick Release Bolts and the upper bolts on the Frame Mounting Brackets volition demand to be loosened slightly to rotate the Grille Guard. Make sure that all hardware is fully tightened after closing the hood earlier moving vehicle. Please read Page eight, "Opening and Closing of Hood," before installing the Grille Guard.
NOTE: Information technology may be necessary to remove/relocate the front license plate and license plate bracket. It is not required, only strongly recommended. If local/state police force requires a license plate, a license plate relocation kit is available.
1. Make up one's mind if the vehicle is or is not equipped with factory tow hooks.
Installation on vehicles with Factory Tow Hooks:
a. Remove the commuter side tow hook, (Figure 1). NOTE: This Grille Baby-sit is not compatible with the factory tow hooks and they volition not be reinstalled.
b. Insert (ane) 12mm 10 35mm Hex Bolt, (1) 12mm Lock Washer and (1) 12mm Foursquare Spacer into the rear hole in the bottom of the frame and up into the factory nut plate, (Figures 2A & 2B). Leave completely loose. Select the driver side Frame Mounting Bracket. Slide the slotted terminate of the Bracket nether the Hex Bolt and Foursquare Washer. Insert (1) 12mm x 35mm Hex Bolt, (ane) 12mm Lock Washer and (1) 12mm Apartment Washer into the remaining forward hole in the Bracket and into the Nut Plate, (Figure 3). Snug just do non tighten the hardware at this fourth dimension.
c. Repeat Steps a – b for passenger side Frame Bracket installation.
Installation on vehicles without Tow Hooks:
a. Remove the lower plastic portion of the bumper and air dam, (Figure 4).
b. Insert (1) 12mm Double Nut Plate through the opening in the front of the driver side of the frame, (Figures 5A & 5B). Line up the threaded holes with the holes in the bottom of the frame.
c. Insert (one) 12mm x 35mm Hex Bolt, (ane) 12mm Lock Washer and (ane) 12mm Square Spacer into the rear hole in the lesser of the frame and up into the Double Nut Plate, (Figures 2A & 2B). Leave completely loose. Select the driver side Frame Mounting Bracket. Slide the slotted end of the Subclass under the Hex Bolt and Foursquare Washer, (Figure 3). Insert (1) 12mm x 35mm Hex Commodities, (1) 12mm Lock Washer and (ane) 12mm Flat Washer into the empty remaining forward hole in the Subclass and Nut Plate. Snug but practice not tighten the hardware at this time.
d. Repeat Steps a – c for passenger side Frame Mounting Subclass installation.
e. Do not reinstall the plastic lower bumper comprehend at this fourth dimension, (See Steps 12a & 12b).
2. Open up the front hood on the vehicle. Locate the top of the bumper bracket backside the driver side of the front bumper. Locate the open pigsty in the top outer end of the bumper bracket, (Figure six). Insert (1) 12mm 10 35mm Bolt Plate downward and into the gap at the top of the bracket and out through the hole with the threaded terminate of the Bolt Plate facing to the rear toward the radiator, (Figures 7A & 7B). Slide the lower end of the commuter side Top Support Bracket, (end with hole), over the Commodities Plate. Secure the Bracket to the Bolt Plate with (1) 12mm Flat Washer, (one) 12mm Lock Washer and (one) 12mm Hex Nut, (Figure 8). Of import: Do not tighten hardware at this fourth dimension.
NOTE: Before proceeding, cover the top of the plastic bumper, (commuter and passenger sides), with removable tape, (masking record for case), to protect the bumper during Top Subclass installation, (Effigy 8). Next, employ a section of the included Adhesive Backed Foam Record to the bottom of both Top Brackets to prevent damage to the painted finish on the vehicle, (Figure 10).
3. Select the driver side Meridian Back up Brace, (Figure 9A). Remove the mill hex bolt in the radiator mountain. Bolt the Support Brace in place with the factory hex bolt, (Figure 9B). Go out loose at this time.
four. Select the commuter side Elevation Bracket. Insert the Top Bracket between the Support Bracket and the Rear Brace, (Figure 10). Line up the (3) holes and commodities the Brackets together with (1) 12mm x 35mm Hex Bolt, (ane) 12mm Lock Washer and (ane) 12mm Apartment Washer, (Figure 9B). Of import: Do not tighten hardware at this fourth dimension.
Notation: Information technology may be necessary to raise or lower the superlative of the Top Bracket to fit properly between the grille and the top of the bumper. Loosen the 12mm Hex Nut attaching the bottom of the Support Bracket to the Bolt Plate, (Figure 8). Move the Acme Bracket up or down as needed to clear the pinnacle of the bumper and line up with the Grille Guard before tightening the hardware. Practice not fully tighten Elevation Bracket hardware until after all hardware has been installed and the Grill Guard properly aligned and adjusted.
v. Repeat Steps 2 – 4 for rider side Top Bracket, Support Subclass and Top Brace installation.
vi. With assist, place the Grille Baby-sit confront down on a make clean surface in front of the vehicle, (Effigy 11). Position the mounting tabs on the Grille Guard upward to the exterior of the Frame Mounting Brackets.
vii. Line up the rear threaded hole in the driver side Frame Mounting Bracket with the hole in the Grille Guard, (Figure 12). Insert (1) 12mm Plastic Washer between the Mounting Bracket and the Grille Guard. Bolt the Grille Guard to the driver side Bracket with (1) 12mm x 35mm Hex Bolt, (1) 12mm Lock Washer and (1) 12mm Flat Washer, (Figure 12). Snug but practice not tighten hardware at this time.
8. Echo Step 7 to attach the Grill Guard to the passenger side Bracket.
nine. Utilize the ii previously installed Hex Bolts as a hinge. Rotate the Grille Baby-sit upward to the vehicle, (Effigy 11). Line up the remaining hole in each Bracket with the Grille Baby-sit. Insert a 12mm Plastic Washer between the Mounting Bracket and the Grille Guard on both sides of the vehicle equally described in Stride 7. Bolt the Grille Guard to the Brackets with (two) 12mm 10 35mm Hex Bolts, (2) 12mm Lock Washers and (2) 12mm Flat Washers. Do non tighten hardware at this time.
10. Next, line up the slotted end of the driver side Peak Bracket with the hole in the Grille Baby-sit upright. Insert (i) 10mm Plastic Washer between the Top Bracket and the Grille Baby-sit, (Figure thirteen). Line up the hole in the Plastic Washer with the pigsty in the Grille Guard and the slot in the Top Subclass. Insert (1) 10mm Quick Release Commodities, (1) 10mm Special Pivot Washer and (1) 10mm Flat Washer through the upright on the Grille Guard first and on through the Plastic Washer and Meridian Subclass. Secure the Quick Release Commodities with (1) 10mm Plastic Washer, (to protect the finish on the Top Bracket), (1) 10mm Flat Washer and (1) 10mm Nylon Lock Nut, (Figures 14A & 14B). Do not tighten hardware at this fourth dimension.
11. Echo Stride 10 for the rider side Quick Release installation.
12. With the hood open, push the Grille Guard dorsum until it is vertical. Marshal, middle and adjust the Grille Guard properly and tighten all Mounting Subclass and Support Bracket hardware.
Vehicles without tow hooks:
a. Once the Frame Brackets are fully tightened to the vehicle, temporarily remove simply the Grille Guard. Hold the plastic lower bumper cover up in the approximate position against the bottom of the bumper and confronting the Brackets, (If encompass was previously removed in Step 1a). Mark the Bracket location onto the dorsum of the bumper comprehend. Cut slots through the encompass to clear the Brackets, (Figure xv). IMPORTANT: For best results, start with a small opening and just trim abroad material required for Subclass clearance. In one case properly trimmed, reinstall plastic bumper cover with the manufactory hardware.
b. Reinstall the Grille Guard and tighten all Mounting Bracket and Support Bracket hardware.
xiii. Release the levers on the Quick Release Bolts, (Effigy xvi), and loosen the pinnacle Hex Bolts on the Frame Mounting Subclass. Alert! Practice non loosen the bolts all the way. Loosen hardware only plenty to motion the Grille Baby-sit. Harm to the truck or Grille Guard may occur.
14. Pull the Grille Guard all the way forward, away from the vehicle, (Figure 17).
xv. Carefully close the hood and check for clearance between the Summit Bracket and the factory grille. Adjust the Brackets up or downward for fit as necessary. IMPORTANT: Ever make sure that the hood and grille will clear the Grille Guard before closing the hood.
sixteen. Close the hood. Push button the Grille Guard back towards the vehicle until it is vertical, check the alignment once more and adjust the Grille Guard as required. Tighten all Mounting Bracket hardware including the Quick Release Bolts, (Figure sixteen).
17. Exercise periodic inspections to the installation to brand certain that all hardware is secure and tight.
To protect your investment, wax this production later installing. Regular waxing is recommended to add a protective layer over the finish. Do not use whatever blazon of shine or wax that may contain abrasives that could damage the stop.
For stainless steel: Aluminum shine may be used to polish pocket-sized scratches and scuffs on the finish. Mild soap may be used also to clean the Grille Guard.
For gloss black finishes: Mild soap may exist used to clean the Grille Guard.

FORD, FORD F-150 & F-150, FORD F-250 & F-250, FORD F-350 & F-350, FORD RANGER, FORD LIGHTNING, SUPERCREW, SUPERCAB, Power STROKE, TRITON V8, ECOBOOST, SUPERDUTY, ARE REGISTERED TRADEMARKS OF THE FORD MOTOR Company. ECOBOOST, CHEVROLET, GMC, CHEVROLET SILVERADO, CHEVROLET TAHOE, GMC SIERRA, SILVERADO, SIERRA,DENALI,VORTEC LS V8, DURAMAX, LTZ, SILVERADO LT, SILVERADO HD, SIERRA ALL TERRAIN X, ECOTEC3, Z-71, SILVERADO 1500, SILVERADO SS, YUKON, AT4,SLE, AND SLT ARE REGISTERED TRADEMARKS OF GENERAL MOTORS Company (GM). DODGE, DODGE RAM, RAM TRUCKS, RAM 1500, RAM 2500, RAM 3500, SRT/10, 1500 SLT PLUS, 1500 SLT, ST, LARAMIE, DAYTONA, MEGA CAB, SLT/SPORT/TRX, SLT/TRX, R/T, SPORT, LARAMIE LONGHORN, TRADESMAN HEAVY DUTY, TRADESMAN/EXPRESS, TRADESMAN, HFE, REBEL, LONGHORN ARE REGISTERED TRADEMARKS OF FIAT CHRYSLER AUTOMOBILES (FCA). ALLISON TRANSMISSION IS A REGISTERED TRADEMARK OF ALLISON TRANSMISSION, INC. CUMMINS IS A REGISTERED TRADEMARK OF CUMMINS INC. SALEEN IS A REGISTERED TRADEMARK OF SALEEN INCORPORATED. ROUSH IS A REGISTERED TRADEMARK OF ROUSH ENTERPRISES, INC. AMERICANTRUCKS HAS NO AFFILIATION WITH THE FORD MOTOR Visitor, CUMMINS, INC., ALLISON TRANSMISSION, INC., ROUSH ENTERPRISES, SALEEN, THE GENERAL MOTORS COMPANY OR FIAT CHRYSLER AUTOMOBILES. THROUGHOUT OUR WEBSITE AND OUR AMERICANTRUCKS SIERRA, RAM, AND SILVERADO Catalog THESE TERMS ARE USED FOR IDENTIFICATION PURPOSES But. 2021 AMERICANTRUCKS.COM. ALL RIGHTS RESERVED
Source: https://www.americantrucks.com/barricade-grille-guard-gloss-black-0914-manu-install.html
0 Response to "How To Install A Brush Guard"
Post a Comment